

Public Safety Diver Tips & Tricks: Body Position
By: Mark Phillips
When we conduct a search in clear water, we do not necessarily need to go through all the processes of conducting a search in zero visibility. If we threw a knife into a clear swimming pool and said, “go find it,” you would look for it from the deck, walk to a point closest to it, and jump in to retrieve it. You wouldn’t even bother with gear. You would hold your breath and jump in. Your eyes would open and you would be able to see it, grab it, and bring it up. Easy and accomplished in far less time than the single trip of a second hand around the face of a clock.
But do the same exercise in a blacked-out mask. Not so easy now, is it? You can’t see. There is no good way to search a large area without being tethered and performing a systematic search. Now it could take you hours, perhaps an entire day to search a swimming pool. What happens if after expending all of that time, all of the resources and manpower hours, you don’t find it? The ability to say something is NOT there is just as good as finding the object you are looking for.
Right?
To do that, there must be a very large amount of trust in the skills of the diver, the tender and the rest of the team. Exactly how sure are you of your ability to successfully search for smaller items? How sure are you of the other divers on your team?
Is pool training good enough?
We are often criticized for training in a swimming pool. We may be told that we just look for a reason to go swimming instead of working in the nasty river. How much training can you do in a pool? The lake? That is clear water too. All you guys do is go look at fish and play… Public safety dive teams are not trained or in training to be recreational divers. Yet the perception of what we do is still misunderstood at times. A HazMat team doesn’t usually have these kinds of issues. But then, dive teams are not generally given the same respect as say a HazMat team. Sometimes there is a lack of understanding, but consider, there is no recreational HazMat … hazmatting?
Pools allow us to focus on…
A clear swimming pool is essential to really learn and become confident in your team’s ability to search. Why? Because it is the ONLY way we can rate and observe BODY POSITION of our divers when they are conducting a zero-visibility search. In a pool, we can simulate blackout conditions and train in safe water.
Body position is critical to the success of an underwater zero-visibility search.
New PSDs are usually taught a small variety of search patterns and are allowed to practice once or twice in a PSD program. Then they are taken to open water and are asked to perform a search for a specific object that is purposefully seeded in the area they are going to perform. This validates the training and practice they just did and builds self-confidence because they are almost forced to be successful. If they were taught proper body position, they will perform in those open water evolutions the same way they practiced in the pool.
Does this sound familiar?
If they are never taught any differently, they believe that they do good searches, have perfected the search action and never miss anything. Is that you? Are YOU – you personally – secure enough with your skills to make that statement? Are you sure??? How do you know? Better yet, how can you prove it?
Practice in a pool.
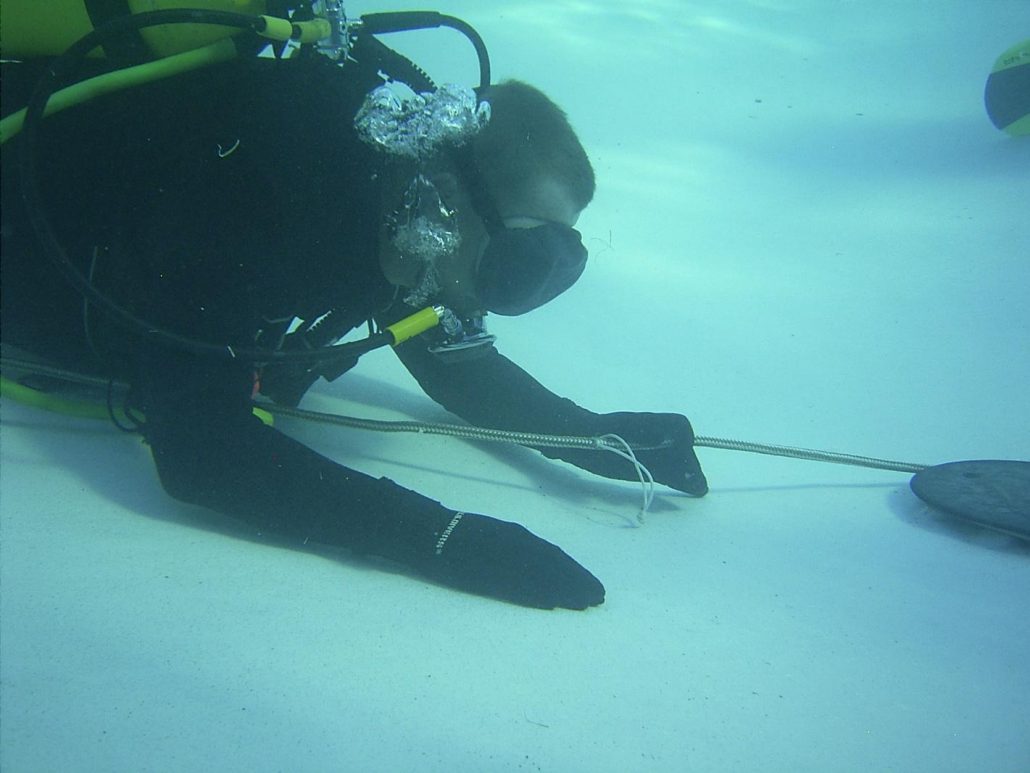
The following photographs were taken during training programs. The divers are not practicing a search pattern; they are following a guide rope through an obstacle course. Part of their instructions is to search along their path, and if they find something, to stop and hold up the object, then set it down again. What this means is they are not tethered for the drill and have both hands available to search. They can search left and right while staying in contact with the guide rope.
As they move down the guide rope, they are practicing their search technique. It is the same search technique they will use on a dive mission.

| Figure 1 Bad body position – Palm only search |
Look at the divers’ position relative to his search arm in Figure 1.This is not a good body position. This is an example of a “palm search”. While this may look extreme, it is far more common than you may think. If you are searching for a body or a vehicle you will probably find it. You will have a successful dive and that will further validate that this is OK. But what happens if you are looking for a smaller item?

| Figure 2 Good body position |
Figure 2 shows the diver flat on the bottom. We do not overweight to plow through mud, but we do want to be heavy enough to maintain this chest down position. Take notice of the gap between the divers’ right elbow and the bottom. That area is NOT being searched. However, if the diver maintains this position, it goes at a slow steady pace that was already searched in the previous pass. Your ability to effectively search for small objects is directly related to your body position and the ability to perform a search from your fingertips to your elbow.

| Figure 3 Poor body position |
Looking at Figure 3, do you think this diver would find a 25 automatic? How about a 12” Bowie knife? If you had never been presented with the idea of good body position while searching, this could be you. So, if this diver said he searched the area well and the gun wasn’t there… How confident will you be after seeing him in clear water performing a search? Is this a palm search or a fingertip to elbow search? Look at the position of the chest relative to the bottom. With the chest high, the body automatically creates a gap, and this too becomes a palm search.
| Figure 4 Better body position |
Comparing Figure 4 to Figure 3 and 2, you can start to see the difference that body position makes in the effectiveness of a search. In Figure 4, the divers’ chest is raised and while this is forcing the arms down a bit, an angle is still created that raises the elbow off the bottom.

| Figure 5 Overreach and palm search |
Figure 5 shows a diver overreaching a search area. Notice what happens to his chest. This overreach lifts the chest off the bottom and while it appears in the photo that the search arm is flat, the elbow is off the bottom and unless he makes a correction will leave a void in his search.

| Figure 6 Working the search around an obstacle. |
Figure 6 shows the diver searching around an obstacle. The obstacle is “engaged” with the guide rope and his task is to search the area surrounding the obstacle. With one hand secure on the obstacle, he is able to maintain reference to the guide rope and search.
How would you rate this search? Notice the position of the chest and elbow.
We find that divers like a hand loop and we give that to them when they are tethered. Being tethered, the diver has a physical connection that secures the search rope – tended line – to the diver. Some divers learned or attempted to learn how to search with two hands without a loop. I have found it to be a rare occurrence to find a diver who is able to function and effectively search with two hands.
Figure 7 shows a common body position for a diver searching with two hands while tethered. Look at the level of the chest and now both elbows. Will he find a body or a vehicle? What about a small closet safe? Odds are in his favor but only because of the size of the object. What about that 25 automatic or the 12” Bowie Knife? Could you be confident telling a homicide detective that the weapon you are looking for is not where this diver just finished searching?

| Figure 7 Two hand search while tethered. |
Body position is going to affect your search pattern. It will affect how much area you actually search. Your dive tender must keep the line taught without pulling the diver off the pattern. If the diver moves towards the tender the rope will begin to slacken. If you do not feel the tension, stop and figure out what happened and recover the tension. Sometimes this is a problem the tender has to deal with but in a lot of instances, the slack is because you swam too far towards the tender and in decreasing the distance you changed the tension on the line. Proper body position will help. But it takes practice, attention to details and the ability to practice until you gain the muscle memory of what a good body position feels like.


The best ways to practice
The only way to correct and to practice your body position while searching is to practice in a clear water environment. Simulate the zero visibility and have other team members watch. Learn from each other. We aren’t looking for fault to be critical, we are looking to improve body position on the bottom and to be more effective when searching for smaller objects.
If you do not have good body position, try adding a small amount of weight to your weight system. You may find you are not releasing all the air from your BCD or dry suit.
It may be that you just naturally are positioned with your chest up. You can try adding a weight to the tank pocket or an ankle weight around the first stage post. This will add weight higher on your body and may help keep your chest down. Just remember, we are not plowing mud furrows and we do not want to add weights that overcome the lift capacity of our BCD.

| Figure 8. A miss is a miss. Because the diver did not search around the obstacle, his body position prevented him from searching the area and he only searched this spot with his fingertips. You can see the path his fingers took along the bottom. No – he did not find the knife. |
Why this is important
In zero visibility we can only rely on our senses. By having proper body positions that keeps your chest on the bottom and your elbows down, you can be confident that you are actually searching the area you are traveling through.
You may get away with bad form if all you do is search for large objects, but accepting that as your best will do little good if you are asked to search for a smaller object.
So, when you practice, practices searching for a door key, a knife, toy guns or any other small objects. Set out a number of them and then search for them and see how many you can consistently find. Practice elbow to fingertip searching and if you find you are guilty of just palm searching – fix it. Be better. Because your miss underwater may be the only time that area will ever be searched.
Chest down, tension on the search / tether line, no rise on inhalation, adjust your weights, dump the excess air in your BCD, practice and get a mental picture of what your body looks like while searching as well as the feel of searching fingertips to elbows. In our work, a miss is a fail. Don’t fail because of poor technique.
When you say you or your team searched an area and did not find what you were looking for, be confident when you say, “It’s not there”.
 https://www.tdisdi.com/wp-content/uploads/2024/02/ERDI-Ambassadr.jpg
628
1200
Rachel Pryke
https://www.tdisdi.com/wp-content/uploads/2021/10/header-web-live.png
Rachel Pryke2024-02-01 10:04:292024-03-26 16:07:01Introducing the 2024 ERDI Ambassadors
https://www.tdisdi.com/wp-content/uploads/2024/02/ERDI-Ambassadr.jpg
628
1200
Rachel Pryke
https://www.tdisdi.com/wp-content/uploads/2021/10/header-web-live.png
Rachel Pryke2024-02-01 10:04:292024-03-26 16:07:01Introducing the 2024 ERDI Ambassadors https://www.tdisdi.com/wp-content/uploads/2024/01/Wheretosearch_Banner.jpg
628
1200
Rachel Pryke
https://www.tdisdi.com/wp-content/uploads/2021/10/header-web-live.png
Rachel Pryke2024-01-17 15:07:522024-03-13 16:44:36Navigating the Depths: Search Theory in Public Safety Diving
https://www.tdisdi.com/wp-content/uploads/2024/01/Wheretosearch_Banner.jpg
628
1200
Rachel Pryke
https://www.tdisdi.com/wp-content/uploads/2021/10/header-web-live.png
Rachel Pryke2024-01-17 15:07:522024-03-13 16:44:36Navigating the Depths: Search Theory in Public Safety Diving Y. ZIN
https://www.tdisdi.com/wp-content/uploads/2023/11/Surface-IceRescue.png
628
1200
Rachel Pryke
https://www.tdisdi.com/wp-content/uploads/2021/10/header-web-live.png
Rachel Pryke2023-11-13 16:38:332024-03-26 16:09:39The 20:10:1 Rule – A Safer Approach to Surface Ice Rescue
Y. ZIN
https://www.tdisdi.com/wp-content/uploads/2023/11/Surface-IceRescue.png
628
1200
Rachel Pryke
https://www.tdisdi.com/wp-content/uploads/2021/10/header-web-live.png
Rachel Pryke2023-11-13 16:38:332024-03-26 16:09:39The 20:10:1 Rule – A Safer Approach to Surface Ice Rescue https://www.tdisdi.com/wp-content/uploads/2023/09/dive-team-investigation.jpg
628
1200
William Drumm
https://www.tdisdi.com/wp-content/uploads/2021/10/header-web-live.png
William Drumm2023-09-20 16:41:392023-09-20 17:26:09Unearthing Evidence: How a Public Safety Dive Team Transformed an Investigation
https://www.tdisdi.com/wp-content/uploads/2023/09/dive-team-investigation.jpg
628
1200
William Drumm
https://www.tdisdi.com/wp-content/uploads/2021/10/header-web-live.png
William Drumm2023-09-20 16:41:392023-09-20 17:26:09Unearthing Evidence: How a Public Safety Dive Team Transformed an Investigation https://www.tdisdi.com/wp-content/uploads/2022/11/erdi-ambassadors.jpg
628
1200
William Drumm
https://www.tdisdi.com/wp-content/uploads/2021/10/header-web-live.png
William Drumm2022-11-28 11:40:402022-11-28 11:40:402023 ERDI Ambassadors
https://www.tdisdi.com/wp-content/uploads/2022/11/erdi-ambassadors.jpg
628
1200
William Drumm
https://www.tdisdi.com/wp-content/uploads/2021/10/header-web-live.png
William Drumm2022-11-28 11:40:402022-11-28 11:40:402023 ERDI Ambassadors https://www.tdisdi.com/wp-content/uploads/2022/10/tender-helps-psd-diver-with-gear.jpg
628
1200
William Drumm
https://www.tdisdi.com/wp-content/uploads/2021/10/header-web-live.png
William Drumm2022-10-20 16:18:392022-10-25 12:12:29PSD Tenders – The Unsung Heros
https://www.tdisdi.com/wp-content/uploads/2022/10/tender-helps-psd-diver-with-gear.jpg
628
1200
William Drumm
https://www.tdisdi.com/wp-content/uploads/2021/10/header-web-live.png
William Drumm2022-10-20 16:18:392022-10-25 12:12:29PSD Tenders – The Unsung Heros https://www.tdisdi.com/wp-content/uploads/2022/04/Throw-Bags_1280x720.jpg
675
1200
Allison Van Sickle
https://www.tdisdi.com/wp-content/uploads/2021/10/header-web-live.png
Allison Van Sickle2022-04-20 12:36:402022-04-28 10:18:44The Selection and Use of Water Rescue Throw Bags
https://www.tdisdi.com/wp-content/uploads/2022/04/Throw-Bags_1280x720.jpg
675
1200
Allison Van Sickle
https://www.tdisdi.com/wp-content/uploads/2021/10/header-web-live.png
Allison Van Sickle2022-04-20 12:36:402022-04-28 10:18:44The Selection and Use of Water Rescue Throw Bags https://www.tdisdi.com/wp-content/uploads/2021/10/Copy-of-ERDI-Article-Headers.jpg
628
1200
James Councill
https://www.tdisdi.com/wp-content/uploads/2021/10/header-web-live.png
James Councill2021-10-20 18:59:092021-10-20 18:59:09My Way is Better Than Your Way
https://www.tdisdi.com/wp-content/uploads/2021/10/Copy-of-ERDI-Article-Headers.jpg
628
1200
James Councill
https://www.tdisdi.com/wp-content/uploads/2021/10/header-web-live.png
James Councill2021-10-20 18:59:092021-10-20 18:59:09My Way is Better Than Your Way
Leave a Reply
Want to join the discussion?Feel free to contribute!