

Creating an Audience with the Facebook Pixel
By: Brittany Bozik
Last month we introduced you to the Facebook Pixel (see: What’s the Facebook Pixel). Now that you know what the Facebook Pixel is and what it does, it’s time to explain how to use it. By use it, we mean creating an audience, this will help you target your ads better to reach the right people at the right time. For example, if you have a page on your site promoting your next dive trip, you could put a pixel on that page to track who’s viewing it. Later on, you would be able to create an audience of people who went to that page and target those visitors with an ad about your upcoming dive trip. Let’s take a look:
Again you’ll start at the Business Manager

From there you’ll go to the menu and select Audiences:

From there you’ll see this:

You’ll then select this:

You’d choose custom audience:

Then you’d select based on website traffic:

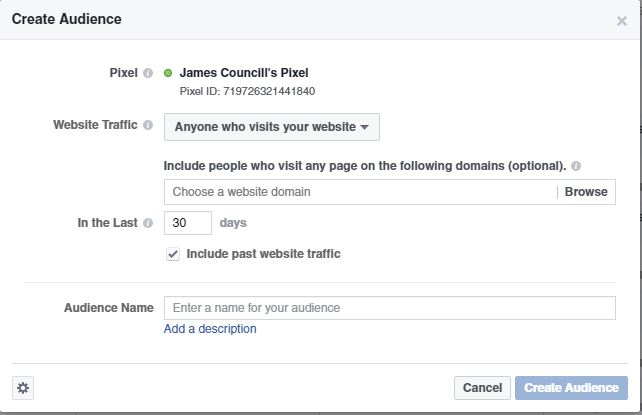
Decide how you want to track people on your website and enter the URL(s) you want to track and you’re done! Now sit back and wait for your audience to populate and you’ll be able to create ads targeted to your website visitors.
To learn how to create an ad using your new audience click the next article in this series (3 of 3) below. We also included the first article for reference:

 https://www.tdisdi.com/wp-content/uploads/2022/08/Better_Diver_1_1280x720.jpg
675
1200
Caitlin Woodman
https://www.tdisdi.com/wp-content/uploads/2021/10/header-web-live.png
Caitlin Woodman2022-08-03 15:21:292022-09-23 16:11:30Five Ways to Become a Better Diver
https://www.tdisdi.com/wp-content/uploads/2022/08/Better_Diver_1_1280x720.jpg
675
1200
Caitlin Woodman
https://www.tdisdi.com/wp-content/uploads/2021/10/header-web-live.png
Caitlin Woodman2022-08-03 15:21:292022-09-23 16:11:30Five Ways to Become a Better Diver https://www.tdisdi.com/wp-content/uploads/2022/07/Room_for_Improvement_1280x720.jpg
675
1200
Allison Van Sickle
https://www.tdisdi.com/wp-content/uploads/2021/10/header-web-live.png
Allison Van Sickle2022-07-05 12:41:012022-07-06 09:23:51Room for Improvement: An Instructor Trainer’s Perspective
https://www.tdisdi.com/wp-content/uploads/2022/07/Room_for_Improvement_1280x720.jpg
675
1200
Allison Van Sickle
https://www.tdisdi.com/wp-content/uploads/2021/10/header-web-live.png
Allison Van Sickle2022-07-05 12:41:012022-07-06 09:23:51Room for Improvement: An Instructor Trainer’s Perspective https://www.tdisdi.com/wp-content/uploads/2022/06/eco-conscious_scuba_diving_1280x720.jpg
675
1200
Allison Van Sickle
https://www.tdisdi.com/wp-content/uploads/2021/10/header-web-live.png
Allison Van Sickle2022-06-02 12:38:422022-06-07 11:49:39Create an Impact by Teaching Eco-Conscious Scuba Diving
https://www.tdisdi.com/wp-content/uploads/2022/06/eco-conscious_scuba_diving_1280x720.jpg
675
1200
Allison Van Sickle
https://www.tdisdi.com/wp-content/uploads/2021/10/header-web-live.png
Allison Van Sickle2022-06-02 12:38:422022-06-07 11:49:39Create an Impact by Teaching Eco-Conscious Scuba Diving https://www.tdisdi.com/wp-content/uploads/2022/04/Ghost-Net-FB1.png
627
1200
Allison Van Sickle
https://www.tdisdi.com/wp-content/uploads/2021/10/header-web-live.png
Allison Van Sickle2022-04-29 10:20:432022-05-06 12:56:53The Diktynna Project
https://www.tdisdi.com/wp-content/uploads/2022/04/Ghost-Net-FB1.png
627
1200
Allison Van Sickle
https://www.tdisdi.com/wp-content/uploads/2021/10/header-web-live.png
Allison Van Sickle2022-04-29 10:20:432022-05-06 12:56:53The Diktynna Project https://www.tdisdi.com/wp-content/uploads/2022/03/Save-a-Dive_Kit_1280x720.jpg
675
1200
Allison Van Sickle
https://www.tdisdi.com/wp-content/uploads/2021/10/header-web-live.png
Allison Van Sickle2022-03-30 11:24:162022-05-13 10:54:00Building Your Professional Save-a-Dive Kit
https://www.tdisdi.com/wp-content/uploads/2022/03/Save-a-Dive_Kit_1280x720.jpg
675
1200
Allison Van Sickle
https://www.tdisdi.com/wp-content/uploads/2021/10/header-web-live.png
Allison Van Sickle2022-03-30 11:24:162022-05-13 10:54:00Building Your Professional Save-a-Dive Kit https://www.tdisdi.com/wp-content/uploads/2022/03/ITW_Israel_FB3.png
627
1200
Allison Van Sickle
https://www.tdisdi.com/wp-content/uploads/2021/10/header-web-live.png
Allison Van Sickle2022-03-28 12:17:322022-04-28 10:21:33ITW Israel: Meet the Instructor Trainers!
https://www.tdisdi.com/wp-content/uploads/2022/03/ITW_Israel_FB3.png
627
1200
Allison Van Sickle
https://www.tdisdi.com/wp-content/uploads/2021/10/header-web-live.png
Allison Van Sickle2022-03-28 12:17:322022-04-28 10:21:33ITW Israel: Meet the Instructor Trainers! https://www.tdisdi.com/wp-content/uploads/2022/02/Indoor_Diver_Pro_1280x720.jpg
720
1280
Allison Van Sickle
https://www.tdisdi.com/wp-content/uploads/2021/10/header-web-live.png
Allison Van Sickle2022-02-24 11:33:262022-02-25 10:09:26Why Does the Dive Industry Need an Indoor Diver Certification?
https://www.tdisdi.com/wp-content/uploads/2022/02/Indoor_Diver_Pro_1280x720.jpg
720
1280
Allison Van Sickle
https://www.tdisdi.com/wp-content/uploads/2021/10/header-web-live.png
Allison Van Sickle2022-02-24 11:33:262022-02-25 10:09:26Why Does the Dive Industry Need an Indoor Diver Certification? https://www.tdisdi.com/wp-content/uploads/2022/02/PFI_Streamlines_Crossover_1280x720.jpg
720
1280
Allison Van Sickle
https://www.tdisdi.com/wp-content/uploads/2021/10/header-web-live.png
Allison Van Sickle2022-02-02 08:19:332022-02-03 14:25:30PFI Streamlines Crossover Process
https://www.tdisdi.com/wp-content/uploads/2022/02/PFI_Streamlines_Crossover_1280x720.jpg
720
1280
Allison Van Sickle
https://www.tdisdi.com/wp-content/uploads/2021/10/header-web-live.png
Allison Van Sickle2022-02-02 08:19:332022-02-03 14:25:30PFI Streamlines Crossover Process
Dodaj komentarz
Chcesz się przyłączyć do dyskusji?Pomóż nam się rozwijać!